Difference between revisions of "Your first boot"
| Line 101: | Line 101: | ||
==== Share a folder with the host system ==== | ==== Share a folder with the host system ==== | ||
| + | You should not run this step as root! | ||
| + | |||
Sometime you might want to be able to share files back and forth between the host (whatever machine you are running virtual box on) and the guest (Linux). | Sometime you might want to be able to share files back and forth between the host (whatever machine you are running virtual box on) and the guest (Linux). | ||
| Line 108: | Line 110: | ||
Open the settings for the Linux machine you have just created and choose the _Shared Folders_ tab. | Open the settings for the Linux machine you have just created and choose the _Shared Folders_ tab. | ||
| + | |||
| + | [[File:Screen Shot 2020-11-09 at 21.24.58.png|600px|test]] | ||
Click on the _+_ icon to the right to add a new folder. | Click on the _+_ icon to the right to add a new folder. | ||
| + | [[File:Screen Shot 2020-11-09 at 21.25.24.png|600px|test]] | ||
| + | |||
| + | Enter the desired information: | ||
| + | |||
| + | [[File:Screen Shot 2020-11-09 at 21.29.58.png|600px|test]] | ||
| + | |||
| + | _Folder Path:_ Here is where you can select the folder on your host machine that you would like to share. You can click on _other_ and browse for the folder you want to select. | ||
| + | |||
| + | _Folder Name:_ This is the name you want to give to this folder (this is used by virtual box when it is listing the shared folder, it is not the name that will appear in your guest machine). | ||
| + | |||
| + | _Read-only_ Select this if you want your guest to only have read access to the folder. | ||
| + | |||
| + | _Auto-mount_ Select this if you want your guest to automatically use this folder every time you start the guest. | ||
| + | |||
| + | _Mount point:_ This is the location in your guest where you want the folder to appear. Your home directory on the guest is at /home/_username_ (where _username_ is the user name you have selected in the _add a user_ step. In the example, I want the folder to show up as _cs202_ in my home directory. | ||
| + | |||
| + | _Make Permanent_ Select this to preserve this folder also when you restart your guest. | ||
| + | |||
| + | Now you can save your settings and restart your machine. | ||
| + | |||
| + | Once you log in using your username, you should be able to verify that the folder is indeed available. If you try to change directory to that folder, you will get a _Permission denied_ error. | ||
| + | |||
| + | [[File:Screen Shot 2020-11-09 at 21.46.27.png|600px|test]] | ||
| + | |||
| + | If you look at the ownership of the folder (using the _ls -l_) command, you can see that the directory is onwed by the user _root_ and group _vboxfs_ and you are not root and you don't belong to the vboxfs group so... no soup for you! | ||
| + | |||
| + | To fix this issue, the best way is to make you part of the vboxfs group and, to do that, you need to edit a file as root! | ||
| + | |||
| + | Type the following command: | ||
| + | |||
| + | <pre style="color: silver; background: black;"> | ||
| + | [avaccari@middlinux ~]$ sudo vim /etc/group | ||
| + | </pre> | ||
| + | |||
| + | You might be asked to enter your password. | ||
| + | |||
| + | A file should open up and look something like this: | ||
| + | |||
| + | [[File:Screen Shot 2020-11-09 at 21.51.46.png|600px|test]] | ||
| + | |||
| + | Scroll down with the arrow keys until you find the _vboxfs:x:109:_ entry and modify it to add your username after the column. | ||
| + | To edit using vim: | ||
| + | * move to the line where _vboxfs:x:109:_ is located | ||
| + | * push _shift+a_ (this should bring you at the end of the line in insert mode) | ||
| + | * type your username | ||
| + | * type _esc_ to exit insert mode | ||
| + | * type the column _:_ to enter command mode (this should show a column at the bottom of the screen) | ||
| + | * enter 'wq' to save the file and quit | ||
| + | You should see something similar to this: | ||
| + | [[File:Screen Shot 2020-11-09 at 21.57.36.png|600px|test]] | ||
| + | Restart your guest and you should now be able to use your folder from both host and guest. | ||
==== Get graphical ==== | ==== Get graphical ==== | ||
Revision as of 23:00, 9 November 2020
Guides> linux > Your first boot
Getting Started
Select your virtual machine from the list on the left.
Click the green "Start" arrow.
Watch the messages fly by.
After a few seconds, you should see a prompt like this:
Arch Linux 5.4.7-arch1-1-ARCH (tty1)

middlinux login:
(If you installed Linux yourself, "middlinux" will be replaced with whatever hostname you chose.)
There is currently no user account for you, so (*this time only*) log in as the generic administrative user, "root". If you used the prebuilt image, the password is "password" (we'll change it in a few minutes); if you installed it yourself, the password is whatever you set it to be during install.
(NB: the user "root" has complete, unfettered access to the entire machine. This means that if you're logged in as root and issue an ill-advised or mistyped command, you could really hose your system. Unless you have an extremely good reason, you should never log in as root. Instead, use the `sudo` program, which allows you to execute a program with temporarily elevated privileges.)
Upon successfully logging in, you should be presented with a shell prompt, indicating that the virtual machine is awaiting input:
[root@middlinux ~]#
Add a user
Since you are going to never log in directly as root, you need to create a user account you *will* use. In the following, replace "pete" with a username of your choice (as with the hostname, limit it to lowercase letters, numbers, and the underscore). Leave "wheel" as it is: this, in combination with the `sudo` program, is what will allow you to run a program with temporary administrator rights. Use the `id` program to verify afterwards. Use the `passwd` program to set the new user's password (note that it won't even print asterisks to let you know you're typing).
[root@middlinux ~]# useradd -m -G wheel pete
[root@middlinux ~]# id pete
uid=1000(pete) gid=1000(pete) groups=1000(pete),998(wheel)
[root@middlinux ~]# passwd pete
Enter new UNIX password:
Retype new UNIX password:
passwd: password updated successfully
Assuming this all works, log out by running `exit` and then attempt to log in as the newly-created user. Your prompt should now look similar to this:
[pete@middlinux ~]$
The "$" instead of the "#" indicates a user shell rather than a root shell.
Verify sudo works, and change root password if necessary
You will need to be able to run commands as root (ie, administrator) to, eg, install new software. The `sudo` program has been installed and configured, which allows you to temporarily take on root privileges to execute a specific command. You can verify it works by running the following command:
[pete@middlinux ~]$ sudo su
It will print a warning and prompt you for *your* password (ie, verifying that you are you, because the `sudo` configuration file says that you are allowed to run `sudo`), and then it should show a root shell prompt:
[root@middlinux ~]#
If you used the prebuilt install image, now is a good time to change the root password to something only you know:
[root@middlinux ~]# passwd
Note that nothing will be shown as you're typing (not even asterisks)!
You should not run this step as root!
Sometime you might want to be able to share files back and forth between the host (whatever machine you are running virtual box on) and the guest (Linux).
One way to achieve this is by _sharing a folder_ between the two environment.
Here is an example on how to do that using a Mac as a host.
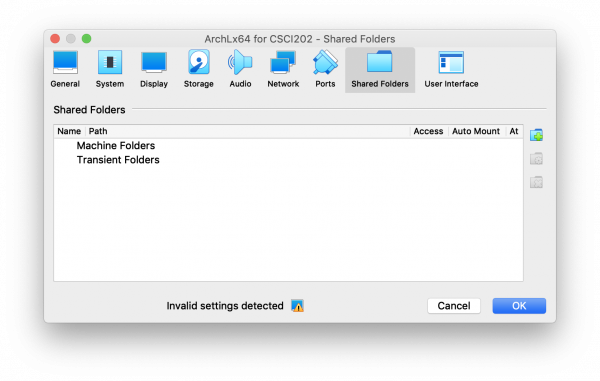
Open the settings for the Linux machine you have just created and choose the _Shared Folders_ tab.
Click on the _+_ icon to the right to add a new folder.
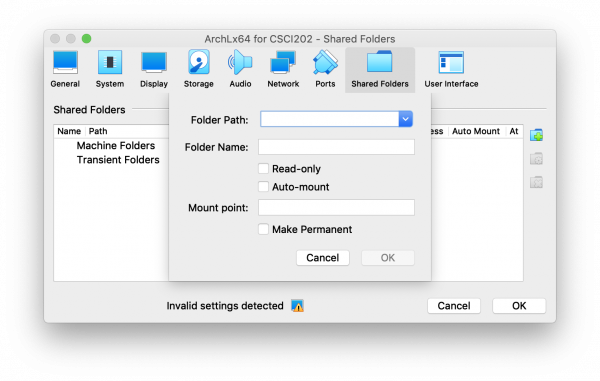
Enter the desired information:
_Folder Path:_ Here is where you can select the folder on your host machine that you would like to share. You can click on _other_ and browse for the folder you want to select.
_Folder Name:_ This is the name you want to give to this folder (this is used by virtual box when it is listing the shared folder, it is not the name that will appear in your guest machine).
_Read-only_ Select this if you want your guest to only have read access to the folder.
_Auto-mount_ Select this if you want your guest to automatically use this folder every time you start the guest.
_Mount point:_ This is the location in your guest where you want the folder to appear. Your home directory on the guest is at /home/_username_ (where _username_ is the user name you have selected in the _add a user_ step. In the example, I want the folder to show up as _cs202_ in my home directory.
_Make Permanent_ Select this to preserve this folder also when you restart your guest.
Now you can save your settings and restart your machine.
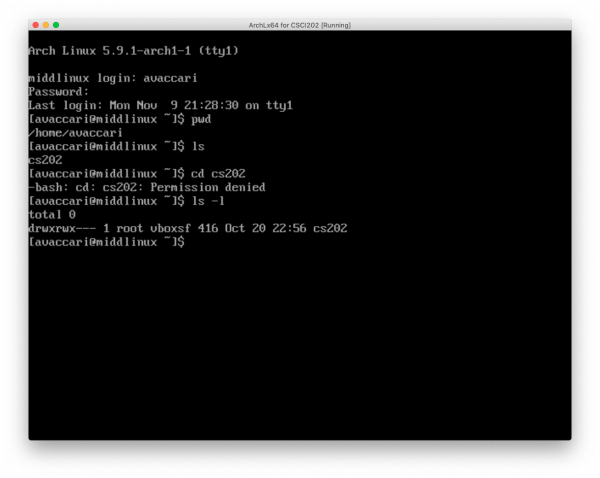
Once you log in using your username, you should be able to verify that the folder is indeed available. If you try to change directory to that folder, you will get a _Permission denied_ error.
If you look at the ownership of the folder (using the _ls -l_) command, you can see that the directory is onwed by the user _root_ and group _vboxfs_ and you are not root and you don't belong to the vboxfs group so... no soup for you!
To fix this issue, the best way is to make you part of the vboxfs group and, to do that, you need to edit a file as root!
Type the following command:
[avaccari@middlinux ~]$ sudo vim /etc/group
You might be asked to enter your password.
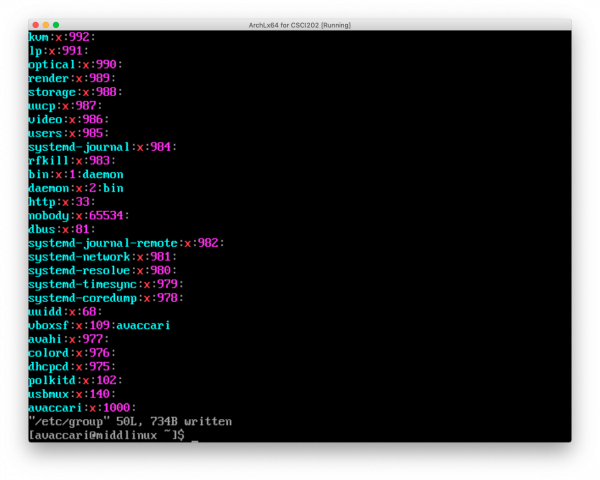
A file should open up and look something like this:
Scroll down with the arrow keys until you find the _vboxfs:x:109:_ entry and modify it to add your username after the column.
To edit using vim:
- move to the line where _vboxfs:x:109:_ is located
- push _shift+a_ (this should bring you at the end of the line in insert mode)
- type your username
- type _esc_ to exit insert mode
- type the column _:_ to enter command mode (this should show a column at the bottom of the screen)
- enter 'wq' to save the file and quit
You should see something similar to this:
Restart your guest and you should now be able to use your folder from both host and guest.
Get graphical
BEFORE RUNNING THIS STEP - MAKE SURE YOU ARE NOT LOGGED INTO ROOT
You can now enter the graphical environment, XFCE:
DO NOT RUN XFCE AS ROOT
[pete@middlinux ~]$ startxfce4
The first time you run XFCE, it will ask if you want to use a default config or just one empty panel. I would recommend the former until you're more comfortable tweaking settings to your taste. To exit from the graphical environment, click your username in the top right and select "Log Out".
Congratulations
You're done. Now there are just a couple things you *need* to know before you start exploring (like, you know, a text editor).


