Difference between revisions of "Configuring Microsoft Outlook 2003"
Thomas Gomez (talk | contribs) |
Thomas Gomez (talk | contribs) |
||
| Line 1: | Line 1: | ||
| − | + | The steps below set up Microsoft Outlook to access your Exchange account on | |
| + | |||
| + | Middlebury's server. | ||
| + | |||
| + | 1. Open the Windows Control Panel from the Start Menu. | ||
| + | |||
| + | 2. Within the Windows Control Panel open the Mail control panel. If no profiles exist, | ||
| + | |||
| + | the Mail control panel displays the dialog box below:<br> | ||
| + | [[Image:mailcpl.jpg|240px]] | ||
| + | Click the Add button, type in the name Outlook, then click Ok. | ||
| + | <p>If a profile does exist the following displays:</p> | ||
| + | <p>[[image:mailsetup.jpg|320px]]</p> | ||
| + | 3. Click on the Email Accounts Button. The Email Accounts wizard starts.<br> | ||
| + | [[image:acctwiz.jpg|400px]] | ||
| + | |||
| + | 4. Select Add a new e-mail account and click the Next button. The Server Type displays | ||
| + | |||
| + | (not pictured). | ||
| + | |||
| + | 5. Select Microsoft Exchange Server and click the Next button. The Exchange Server | ||
| + | |||
| + | settings displays. | ||
| + | |||
| + | [[image:svrset.jpg|400px]] | ||
| + | |||
| + | 6. Type '''panther.middlebury.edu''' for the Exchange server name and your user name in | ||
| + | |||
| + | the user name field, then click the More Settings button.<br> | ||
| + | A login to panther.middlebury.edu displays. | ||
| + | |||
| + | [[image:login.jpg]] | ||
| + | |||
| + | 7. In the User name field type '''midd\your-user-id''' (e.g. midd\jsmith); in the | ||
| + | |||
| + | password field type the password you set via the web, then click OK. | ||
| + | |||
| + | After a successful login the Exchange Server settings dialog box displays. | ||
| + | |||
| + | [[Image:svrset2.jpg]] | ||
| + | |||
| + | 8. Select the Connection tab. Check the Connect to my Exchange mailbox using HTTP check | ||
| + | |||
| + | box near the bottom then click the Exchange Proxy Settings button. | ||
| + | |||
| + | [[Image:setupconnection.jpg]] | ||
| + | |||
| + | The Exchange Proxy Settings dialog box displays. | ||
| + | |||
| + | [[image:proxy.jpg]] | ||
| + | |||
| + | 9. In the Use this URL… field type mail.middlebury.edu. Make sure the check boxes for On fast networks… and On Slow networks… are checked. Make sure the Proxy Authentication settings uses NTLM Authentication. | ||
| + | |||
| + | 10. Click the OK button to close the Exchange Proxy Settings dialog box. | ||
| + | |||
| + | 11. Click the Ok button to close the Microsoft Exchange Server dialog box. | ||
| + | |||
| + | 12. Click the Next button to continue the Email Accounts wizard. If you have an existing email account created you may receive a notice to change default delivery mailbox for your new account. Click Yes to continue. | ||
| + | |||
| + | 13. Click the Finish button to close the Email Accounts wizard. | ||
| + | |||
| + | 14. Click Close to close the Mail control panel. | ||
| + | |||
| + | You can now start Outlook. You will be prompted to log into the panther.middlebury.edu server when Outlook starts. Your user name must be in the form '''midd\your-user-id'''. | ||
Revision as of 17:31, 8 May 2009
The steps below set up Microsoft Outlook to access your Exchange account on
Middlebury's server.
1. Open the Windows Control Panel from the Start Menu.
2. Within the Windows Control Panel open the Mail control panel. If no profiles exist,
the Mail control panel displays the dialog box below:
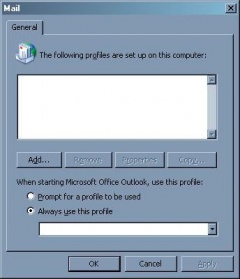 Click the Add button, type in the name Outlook, then click Ok.
If a profile does exist the following displays:
3. Click on the Email Accounts Button. The Email Accounts wizard starts.
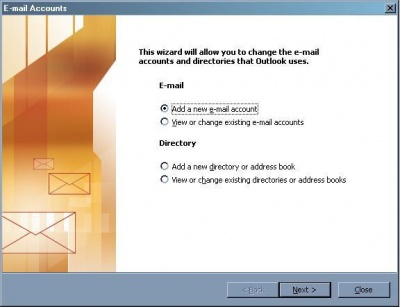
4. Select Add a new e-mail account and click the Next button. The Server Type displays
(not pictured).
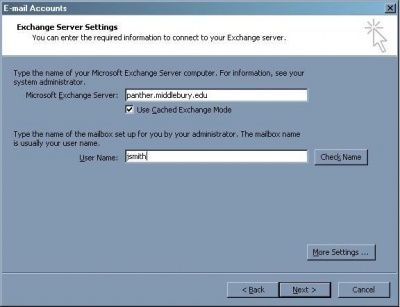
5. Select Microsoft Exchange Server and click the Next button. The Exchange Server
settings displays.
6. Type panther.middlebury.edu for the Exchange server name and your user name in
the user name field, then click the More Settings button.
A login to panther.middlebury.edu displays.
7. In the User name field type midd\your-user-id (e.g. midd\jsmith); in the
password field type the password you set via the web, then click OK.
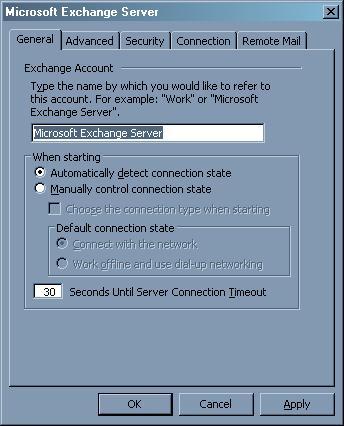
After a successful login the Exchange Server settings dialog box displays.
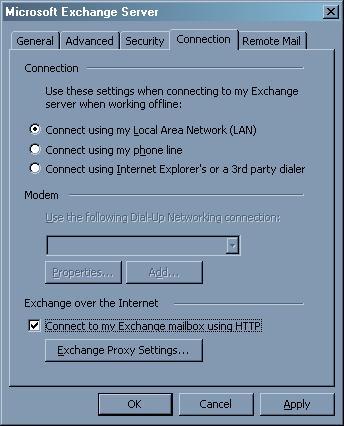
8. Select the Connection tab. Check the Connect to my Exchange mailbox using HTTP check
box near the bottom then click the Exchange Proxy Settings button.
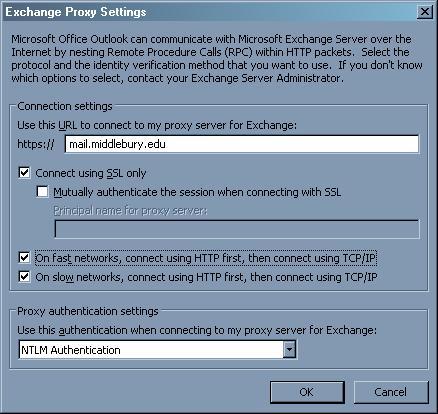
The Exchange Proxy Settings dialog box displays.
9. In the Use this URL… field type mail.middlebury.edu. Make sure the check boxes for On fast networks… and On Slow networks… are checked. Make sure the Proxy Authentication settings uses NTLM Authentication.
10. Click the OK button to close the Exchange Proxy Settings dialog box.
11. Click the Ok button to close the Microsoft Exchange Server dialog box.
12. Click the Next button to continue the Email Accounts wizard. If you have an existing email account created you may receive a notice to change default delivery mailbox for your new account. Click Yes to continue.
13. Click the Finish button to close the Email Accounts wizard.
14. Click Close to close the Mail control panel.
You can now start Outlook. You will be prompted to log into the panther.middlebury.edu server when Outlook starts. Your user name must be in the form midd\your-user-id.

