Main Page
Welcome
Purpose of the PIEmatrix Wiki
Welcome to the PIEmatrix Wiki. This Wiki contains publicly accessible documentation contributed and maintained by anybody interested in working with PIEmatrix.
What goes in the PIEmatrix Wiki?
Some examples of content are:
- What are the benefits of using PIEmatrix
- How to get a PIEmatrix account
- How to start a project
- Examples of what PIEmatrix can be used for
- What a department should be mindful of when using PIEmatrix
Guidelines for consistency
- Users are strongly encouraged to watch Wiki pages with content that relates to their functional work in order to ensure content is accurate and current.
- Do not create lengthy Wiki articles. Instead, organize content thematically and create links between relevant content using Hyperlinks and Categories.
- Add/update content on wiki stub (incomplete) pages.
- Create a Table of Contents (if page is NOT short) by adding section headings (if the page includes 4 or more sections, add a Table of Contents)
- Assign tags/categories to each page. Categorize carefully and frequently. Check for relevant tags/categories before creating new categories.
Who can contribute content to the PIEmatrix Wiki?
Anyone. (Individuals watching a Wiki page will receive automatic notification of changes made to Wiki articles. Changes may be reverted at any time.)
What to use PIEmatrix for
Think of all the great knowledge your organization has. You may have lots of goodies stored on the servers, in people’s e-mail folders, and in their heads. You may feel confident that your firm has standard processes, but are they instantly accessible?
There are three common problems. 1) is not having a good way to get this knowledge out of people’s heads and into a central standard system. 2) is not having this great knowledge someplace so it’s instantly accessible at your employee's fingertips. 3) is not being able to repeat it.
What’s needed is a smart and dynamic place for your knowledge. It needs to be easy for your teams to get instant access to the details of how to get work done well and why they are doing it. Once this is in place, then it’s a matter of setting up sessions for the subject matter experts to migrate their knowledge into the central system. The process knowledge should be stored contextually with the action steps. For example, PIEmatrix provides a way to store detail knowledge inside each action step object. All the user needs to do is to hover over the step to get a pop up of the process tips and tricks.
The next part is repeatability and scale: PIEmatrix makes it easy to repeat your set of knowledge content over and over for like-projects and like-business processes.
Now think of your stakeholders, partners, and end-customer team members. Imagine that they too have instant access to know what to do next. This is powerful!
Make your accumulated knowledge repeatable so any of your team members in the world can kick off a new project with the latest and greatest know-how.
Why PIEmatrix and not my xls/doc/tasks etc. list?
- We are all very visual - PIEmatrix gives you the to-do list if you want it AND it helps you to visually break up the process in to "chapters" that help to conceptualize the different pieces of the project
- We need to know what needs to happen before we can do the next step - PIEmatrix allows you to create dependencies of steps AND sends you an email when your step can be done, i.e., the steps it is dependent on have been completed
- We might need additional documents - PIEmatrix allows us to upload those files (or links) so that we don't have to search for them in our email, the server, ...
- Nobody likes nagging - PIEmatrix reminds others (and you) when steps are due so you don't have to remind them
- Manage workload - PIEmatrix shows the to-do's for each member in your group AND allows you to plan the project looking at the timeline and who has to do what in any given timeline
Sample PIEmatrix Projects
- Creating a new Project Proposal
- RFP
- Your departments annual task list
- A complex long-term process such as creating the company's budget, tax due diligence, annual benefit enrollment, Website updates (tracking updates and postings that need to happen throughout the year)
- Meeting calendar with steps that remind you of best practice meeting prep, meeting after work...
Getting Access to PIEmatrix
Any Interested User
Any interested user can get a Free Trial by clicking on the button on the PIEMatrix website button.
At Green Mountain Higher Education Consortium Schools
- At Middlebury College contact Corinna Noelke
- At Champlain College contact Tee Mulhall
- At Saint Michael's College contact Joann Trottier
- Any Faculty, Student, and Staff can get a PIEmatrix account. If you would like to work with outside vendors on projects in PIEmatrix, they can be set up with a PIEmatrix account as well.
Usage Policy
- Be mindful of the information contained in files that are uploaded into PIEmatrix
- At Middlebury College be mindful of the following policies: Payment Card Industry Data Security Standard and the Data Classification Policy
PIEmatrix Login and Use
- Once your PIEmatrix account has been created, you will receive an email from PIEmatrix with a temporary password.
- Go to Piematrix website and log in using your full email address with which you registered.
- At Middlebury College this would be (xxxxx@middlebury.edu) or (xxxxx@miis.edu) and your assigned password.
- When you log in with that password you will be asked to change your password.
- PIEmatrix works on all browsers.
- PIEmatrix requires Adobe Flash to be installed.
Your Own Settings
Email Settings
- You can set whether you would like to receive notifications from PIEmatrix immediately or in a digest the next day
- Go to Settings in the upper right-hand corner. Clicking on "Settings" will open a new tab in the browser.
- On the left side bar choose "My Preferences - Email"
- By clicking on the blue triangles next to, e.g., "Social Notifications", all options are displayed
- Click on "Edit" on top of the page and edit as you see fit
- Note the "Task Due Notifications" on the bottom as well which govern the daily update email from PIEmatrx
Log Out Timer
Under "My Preferences - Application" you can set how long it takes for PIEmatrix to log you out
Projects
Getting Started
- Go to projects, click on project list, you'll see a "Create Project" button

- Click on the "Create Project" button and a wizard opens
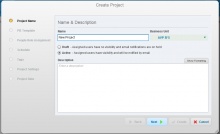
- Name the project
- Choose the right business unit in which you are working
- Choose "Draft" mode, this will allow you to play with the project without any team members receiving notifications
- It is a Best Practice to include a description of the project
- Click next and choose a template, a basic template is EZ PM (your area), it has just three slices called "Plan", "Execute", "Close"
- Drag people into the roles: you are likely the "Project Manager", the "Project Administrator" might be your supervisor, include in "Team" everybody you think will be involved in this project
- Click next - for most projects the defaults work fine
- Click next - add tags that will help you find the project, these should be keywords like FY15, Name of Area this project is in, etc., be mindful of spelling, tags cannot be deleted
- Click next - defaults are fine for most projects
- Click create - the project gets created and you'll be asked whether you want to open the project
- Note: at any given time the parameters entered into the wizard can be changed by going to the blue info button in the upper right-hand corner when you are in the project


Layers versus Pie Slices versus Boxes versus Steps
- Layers: the round pie that you see when you open a template or project. If you stack a project, you stack several layers (of pie) on top of each other
- Pie Slices: are the phases or stages of the process/project, e.g, Plan, Build (or Execute), Close or January, February, March, etc.
- Boxes: contain action steps, they help you organize steps into groups to make your processes/projects easier to navigate and more efficient to complete; think of them as the chapters in a book
- Steps: these are the actionable tasks for you to do, you will track your progress in a process/project by showing that a step has not started yet, is in progress (to varying degrees), is completed, or is not needed after all
Some Editing Suggestions
- When you start a new project, it might be easiest to first think about the major pieces of your project - make those into Boxes
- Write down the steps you have in mind, add the first step, write down the step, hit enter, write the next step, hit enter, etc.
- When the steps start falling off your screen, think about creating a new Box to break down the steps into manageable chunks
- Re-read your steps, order them so it makes sense to you, then assign people (when you are working in Projects) or roles (when you are working in Templates) by opening the first step, assigning the person/role. Then notice the little blue arrows on the bottom of the wizard which allow you to move to the next step to assign a person/role, move to the next step, etc.
- Think about duration of a step, again click on the first step and edit the duration, then move down within the wizard to the next step. Duration should take into account not just how long the task takes but how long it will realistically take for somebody to get to it, do it, let you know that it is done - this means a 20 min tasks might need a 5 day duration...
- Are there steps that are dependent on a different step? Set that dependency by clicking on the Link when you hover over the step that is dependent on a different step; if the steps are sequenced, i.e., Step 1 needs to be done for Step 2 to happen which needs to be done for Step 3 to happen etc., then you can "Sequence" all the steps in a box by clicking on the gear in the lower right-hand corner of the box and clicking on "Sequence Steps"
- Are there any documents or links you'll need? Add them by clicking on "Files" when you hover over the appropriate step
- Last, but not least, when you are in a Project (not a template), go to the "Planning" tab (on the right side) and start planning by entering dates, make sure to click on the first slice so that no boxes can be seen, that will ensure that you see all steps in all slices and all boxes when you are planning the timeline for the entire project
Issues versus Risks
- Risk is an uncertain event, that if materialized, could alter the course of a project. Or if it materializes, it becomes a real issue. => set up a mitigation plan to help avoid a risk from turning into a real and actual problem, aka an issue
- Issue is an actual even that has happened or is in the process of happening that is altering the course of a project until resolved. => solve it ASAP
Stacking of Projects
If you have several processes/projects going on that belong together but each has too many steps to put them all into one layer, you can stack the projects.
Examples
1st example is the Budget Office's timeline. They have:
- monthly tasks that need to happen each month
- an annual timeline of tasks that need to happen at certain times of the year, e.g., Board materials need to be prepared quarterly, a government report is due at a certain of the year, etc.
- the actual budget creation timeline
In order to see how the different steps in each of the three timelines effect steps in one of the other timelines, the Budget Office created a "Stacked" Template (and project)
2nd example is a Software Implementation project. There are steps that need to be done by:
- IT
- the department getting the new software
- the vendor
Steps for all three areas happen often simultaneously and are dependent on each other. So that it does not become confusing, IT, the Department, and the Vendor each get their own layer. Then these three layers are stacked into one project. This allows to create dependencies between steps done by IT vs. the Department, etc. It also allows to see the overall progress of the project. Last but not least, as you work on 'your' steps, you can just look at the layer that concerns you and your view is not cluttered by what the other 2 areas need to do
How to Stack
The Help Center has a good explanation. Remember that only layers with the same number of slices which are named the same can be stacked. That means you first create the individual layers, e.g., Department, IT, Vendor, then you create the stacked template. When you need to make changes to the template, make the change to the individual template layer, it will then flow through to your stacked template and your project which uses that stacked template (if you set the project setting to "Dynamic")
Templates
What are Templates?
- Every Project is based on a template. Each template consists of a pie with one to several pie slices and possibly boxes and steps already added
- A very basic template can for example have three slices that are e.g., called "Plan", "Execute", and "Close" without any boxes or steps
- A sophisticated template can involve many slices with each several boxes and steps associated with those boxes.
- A stacked template is template that includes several pies (all with the same amount of slices and names of slices) "stacked" on top of each other
When do you create boxes/steps in a template vs. a project?
- If you are working on a one-time project you would choose a template that suits your needs and then add any boxes/steps on the project level
- If you plan to do this project over and over again, you ideally create the boxes/steps on the template level as it is the template you would use again for the next time around
What do you do in Templates vs. Projects?
Assuming that this is a project you will do again and you thus would like a template that is as good as it gets so that the next time around it will be as easy as pie... to create a new project:
- Templates:
- Add / Delete / (Re)name Slices
- Add / Delete / (Re)name Boxes
- Add / Delete / (Re)name Steps and add descriptions to steps
- Changing position of any of above
- Assign roles to the steps
- Update duration of a step
- Set dependencies between steps
- Upload files that are used as templates, instructions, etc.
- Projects:
- Assign the actual people who will fill the roles assigned in the template (you do this by clicking on the blue "Info" button on the upper right-hand side
- Set dates
Available Templates
- PIEmatrix has a "Community" were users have already and can upload templates too. You find the "Community" by clicking on "PIE Templates" on the top and then on "Template Community" written in dark blue on the right side
- Whenever you use an existing template in your PIEmatrix instance - be mindful not to change it if other users are using it as well, instead copy it and make the adjustments to this new template that is now 'yours'
- For Middlebury College Users:
- The "EZ PM" template available in each Business Unit has just three slices called "Plan", "Execute", "Close", this is a good start for any new project. If you would like to use this template as a basis to create a new project in the template area, just copy the "EZ PM" template
- There are several calendar based templates for the calendar year or by fiscal year
- There are some imported templates like "Annual Marketing Plan", "Grant Management", "RFP Process"
What your Department should discuss before/when using PIEmatrix
- Tags: agree on the tags. They act as the keywords by which you search for a project. Be mindful not to use for example HR and Human Resources. When searching you would need to remember to search for both HR and Human Resources to find all projects that relate to Human Resources. Also be mindful of spelling - tags cannot be deleted...
- Naming of Projects: If you have a numbering convention or naming convention that you are using for your projects or do not have one yet at all - make sure everybody in your department knows the preferred naming method, e.g., by employee number, by project number, by area to which project belongs, etc.
- Naming of Roles in Templates: it might be best to create role names that have a common theme at the beginning, e.g., HR Benefits Specialist, HR Retirement Specialist, HR... so that all roles related to your area show up together when you are assigning roles to steps, this will make the role assigning much faster
- More on Roles: you are setting up a template because you will use this process again - imagine that people involved in the project change - now come up with a name for the type of person who will do this step no matter whether this year it is Sarah who is doing these steps and next year it is John because Sarah moved on - you want to have a name for the role that makes it clear what type of person should be assigned to this task
Need Technical Help with your Project?
PIEmatrix provides the best resources for technical questions about PIEmatrix use so you can get help when you need it:
- Videos: Most pages have a link to a video on the upper right-hand side (white area) with a video specific to the page you are on.
- Tips: Most pages also have "Tips" which explain the main parts of a page right next to the video link
- Help Center: Click on "Help" on the upper right-hand side for access to the software's own Help Center
- Live Chat: the link can be found at the bottom right of the Help Center when you are logged into PIEmatrix.com
- Phone support: 802.318.4891
- Email support: support@piematrix.com
Wiki Edit Help
- You may wish to use your userpage (click on your name at the top when logged in) to practice or "test" new content to make sure it looks good, before copying and pasting it elsewhere.
- Wiki Cheatsheet
- User's Guide for information on using the wiki software.
- Configuration settings list
- MediaWiki FAQ
- MediaWiki release mailing list